
Unless you’re riding it, travelling with a bicycle can be a real pain in the backside – in particular if you want to use trains.
Many high-speed trains in Europe don’t allow bicycles at all. Those which do have very limited capacity and you have to book in advance. In peak season, bike spaces on popular connections are often booked out.


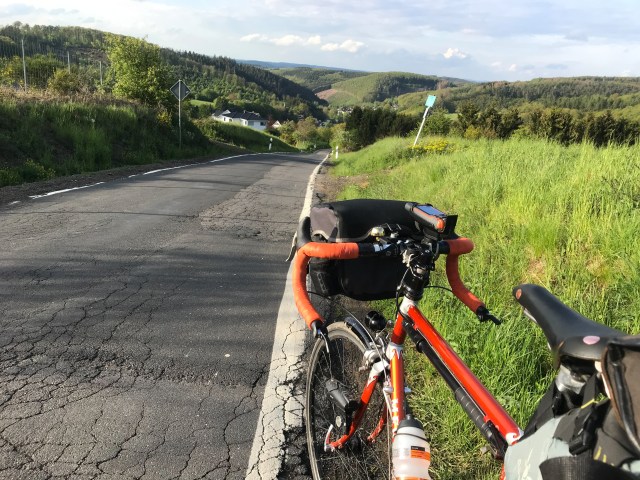
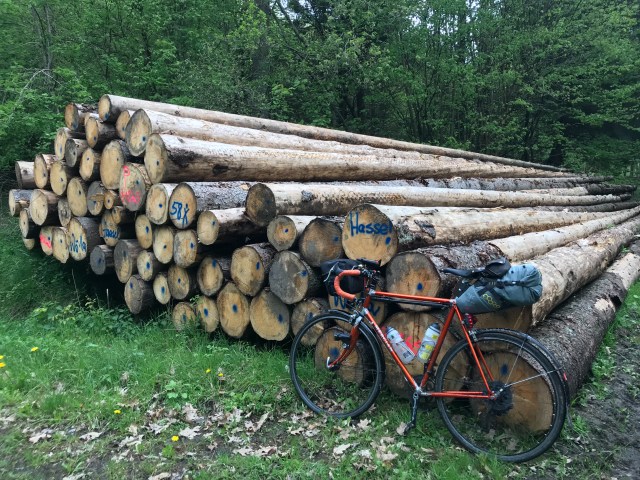
For city trips, I love to take my Brompton on the train. However, that’s not a very appealing option when it comes to touring and Audaxing.

Hence, I had been pondering about a bike that is optimised for train travel.
For a number of reasons, I did not fancy another folding bike with larger wheels. I was after a proper road bike which I could take on any train, no questions asked.
My first idea was to get a bike with S&S couplings, allowing to split the main frame into two bits. The different bits and bobs can then packed into a suitcase that has the size of the wheels.
It is much easier to handle than an ordinary bike box and potentially cheaper to check in on planes. Many US riders on LEL 2017 had such a setup, and here’s a long-term review.
However, while such bikes are handy for air travel, I think they are not ideal for trains. Without the suitcase, handling the two separated frame parts and the wheels is not really straightforward. I once had a Moulton TSR, which frame could be split. But the separated parts turned out to be really unwieldy.

The suitcase also creates a problem on rides where you start at A but want to finish at B. Getting the S&S suitcase from the starting point to the finish could be a logistical challenge.
This is how why I eventually ended up with a “Rinko” bike. This is a concept that was born in Japan. When when it comes to travel with bikes on European high speed trains, I think it’s the best option available. (Maybe things are different in the US, as this blog post argues convincingly.)
The fundamental idea
The gist of it is pretty simple: Have a totally normal bicycle that can easily be dismantled and packed into one compact package so you can take it as carry-on luggage on any train.

The starting point is the observation that a bike’s main frame is actually rather compact and not bulky at all – if you remove the rear wheel, the handle bar and the fork.

The rest is just an operational issue. On ordinary bikes, it’s quite a faff to remove the handle bar and the fork. Both are connected to the main frame and with each other by the brake cables, and – unless you use electronic shifting – by the gear cables.
The hardware
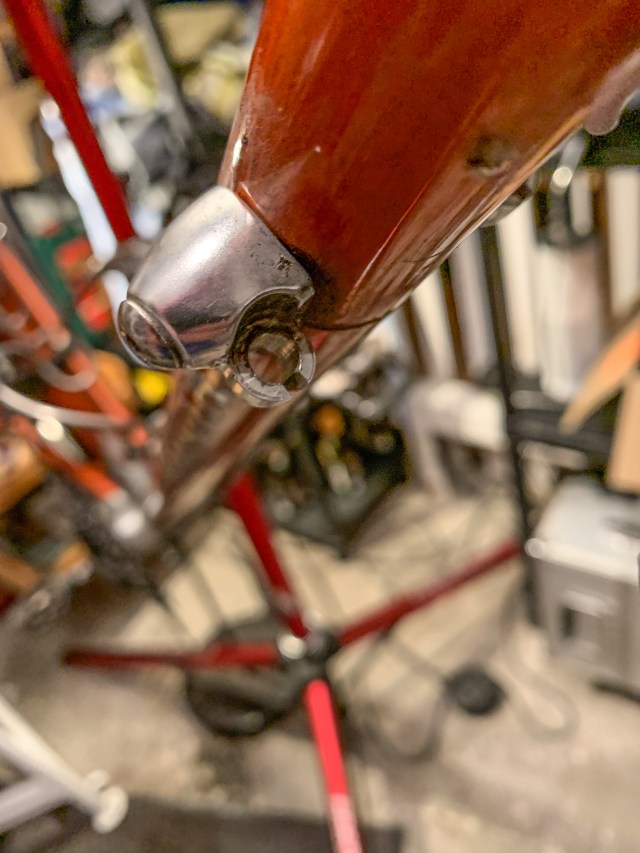
The basic thing that needs to be different on a Rinko bike is that it needs to be easy to separate the handlebar from the rest of the bike. This requires that all cables are externally wired (no sleek in-frame routing, I’m afraid), that all cable stops are slotted, and that the brakes can be unhooked.

It helps to have an A head headset which can removed easily, but Jan Heine at René Herse bikes also offers traditional headsets that are designed for Rinko.
A chain peg on the rear frame which holds the chain tight when the rear wheel is removed also comes in handy (Annoyingly, I forgot to add that detail.)
In themselves, these tweaks are relatively minor, but best applied to a new, made-from-scratch custom-made frame, rather an existing off-the peg bike.
I commissioned Derby-based frame builders Mercian Cycles with this, and it was no problem at all.
I am using Paul Components brakes – the “Racer medium” – with a center-pull mechanism that are a nightmare to set up but work beautifully afterwards. It’s very easy to separate the brake cable from the actual brakes, and at the same time secure as the brake’s are designed in a way that the cable cannot unhook itself.

(Another great advantage of the Paul brakes is that they come with plenty of clearance for wider tyres – this is why I later put them on my ‘normal’ Audax bike as well.)
Unless you want to use down-tube shifters – a step too far even for me – you need cable splitters for the gear cable. I’m using Moulton ones’ but there are several options available.
You also need special, slotted down tube cable stops to remove the gear cables.
The extra kit
There are in fact very few additional items necessary to create a Rinko bike. The most important one is a kind of bracket that goes into the bike’s rear drop outs and serves as a stand while the bike is in Rinko mode.
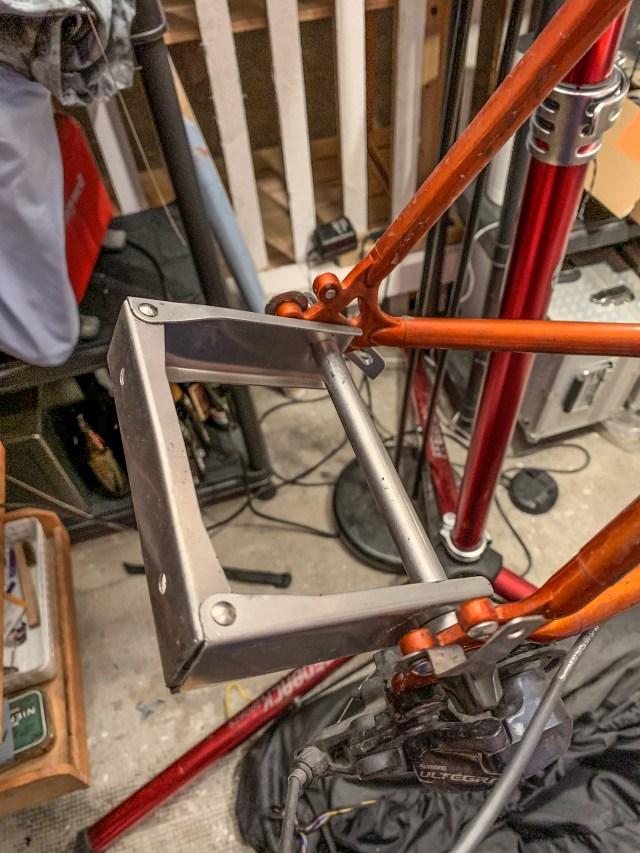
The frame will then stand on the rear end of the saddle and this special bracket, which protects the drop outs as well as the rear derailleur.

Additionally, pads to protect the frame from scratching (more on this later) are sensible. In theory, you could use tube isolation from the DIY store, but if you want to carry the stuff when riding, it’s ab bit bulky. I use Ostrich tube covers which come with velcro straps, are quite light but do the job.

The last missing item for the perfect Rinko experience is a bag. In Japan, apparently quite a few different are on sale. I got a bag from Ostrich, which packs smaller than a 500ml water bottle.
How does the disassembly and packing work?
It takes some to get the hang of it. I would lie if I would not admit that during the first few it’s quite a faff.
It takes some time to work out the best routine. These days, this is my regime:
-
I start by loosing the headset bolt and the bolt’s stem but for the time begin leave the handlebar and the stem normally mounted.
-
Unhinge the brakes and remove the brake cables.
-
Turn around the bike so it stands on the handlebar and the saddle.
-
Remove the pedals (not entirely necessary)
-
Remove the rear wheel.
- If applicable: Remove, the rear one.
-
But the special Rinko stand into the rear drop outs.
-
Remove the handlebar and the front fork including the front wheel and any front mudguard (It took me a while to clock that fork and front wheel remain one package.)
-
Add padding to the parts that may be scratched (more on this later)
-
Put the rear wheel, with the cassette facing outside on the floor
-
Put the main frame on top of the rear wheel
-
Put the fork on top of the mail frame
-
use the straps that come with the Ostrich badge to tie all frame, fork and wheel together into one package where ideally no part is moving
-
Turn the package around by 90 degrees to it stand on the saddle’s rear end and the Rinko bracket in the rear end.
-
Put it into the Ostrich bag
-
Add the Ostrich shoulder strap to frame and bag.
-
Add the handlebar on top of the folded package.
-
Wash your hands
Initially, this takes 15 to 20 minutes, but you get faster over time. Here’s a detailed step-by-step guide that I found useful.

The mudguards
The good news first: The front mudguard is not at all a problem. Any standard one will do, as does not have to be removed at all. The fork, the wheel and any potential mudguard go into the package in one part.
The bad news is that the rear mudguard is making more trouble. If you use a standard, full-sized mudguard, you would have to remove it entirely. That’s quite a faff.
Real Rinko supremos use an optimised rear mudguard that can be split into two parts at the rear frame’s brake bridge.
Unfortunately, at least in Europe, you cannot buy such Rinko mudgards off the peg. Even the special bolt you need for this is not easy to get.
Building your own Rinko mudguard requires a lot of handicraft work, and I’m not really a genius when it comes to working with metal.
As I have a different Audaxing bike proper mudguards, I concluded that – for now – I won’t bother with this.
As a work around on rainy rides where I need to put the bike on bike-restricted trains, I have the option of mounting a SKS Raceblade Long on the rear. On its merit, it’s not an ideal mudguard – in particular if you mounted in line with the official design, where the mounts are put on the rear wheel’s quick release.
As a consequence, you need to remove the mudguard before you can take the wheel off – not ideal if you have a puncture at 3am in the morning in pouring rain during the third night of London Edinburgh London.
My frame luckily has eyelets for normal mudguards and a rack, and that’s where the mounts for the SKS mudguard are mounted. It does the job.
How is travelling with a Rinko bike?
Ace – I’ve used it around a dozen times since I got the bike last fall, taking it on the German ICE high speed train as well as the Eurostar to London, where it was x-rayed that the security check.
I never had any problem.
Walking with the bike for a longer distances is not precisely fun, as it feels rather heavy over time. The Ostrich bag comes with a shoulder strap, and I added some strap padding from the strap of an Ortlieb bag that I don’t use.
This is a bit of an improvement but you would not want to run a Marathon with a Rinko bike hanging over your shoulder.
What are the downsides?
The biggest risk is scratching the bike either when packing it up, or when travelling with it. I covered the frame with helicopter tape to limit the potential damage, and add padding to the most exposed areas, like the inside leg of the fork and the the bit where the main frame and the fork’s steerer are next to each other.
It’s also key to make sure the individual parts are tightly tied to each other – that what cannot move cannot scratch.
Despite all the effort, and to my big grievance, I have added a couple of nasty crashes to the bike – the quick release of the front wheel was rubbing at the seat post. I now add another patch of padding but the damage has been done.
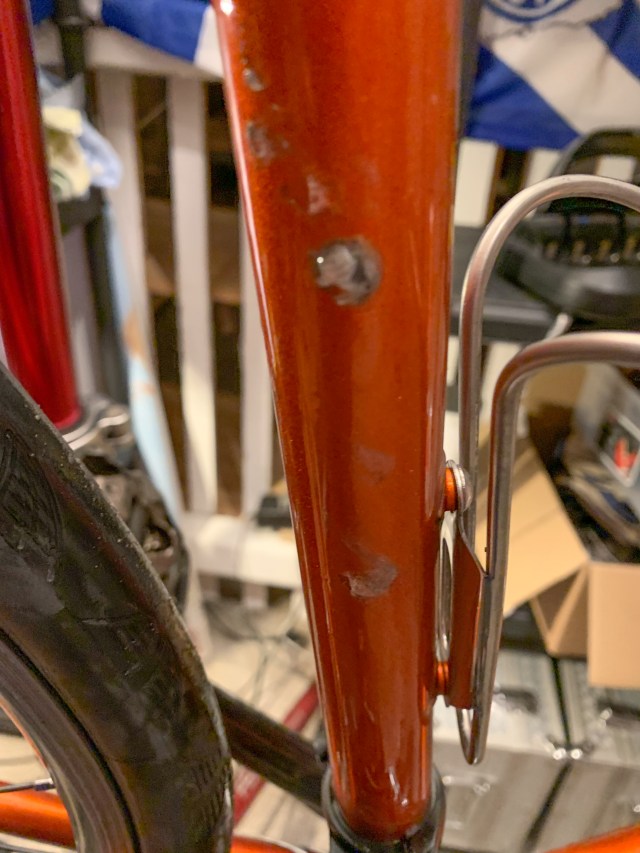
The scratches are really annoying. But then, if you want a scratch free bike, the best strategy is not using it at all and mount it to your dinner room’s wall, ideally behind glass….
As my bike is made of steel, this is just a cosmetic issue. Had the frame been made out of carbon rather than steel, this may have been different, as the quick release might have structurally damaged the seat post. It probably makes sense to take extra care if you want to to turn a Carbon machine into a Rinko bike.
When dismantling or rebuilding the bike at a railway station, I also live in the constant fear to lose the allen keys or some of the small bits and pieces that needed to be removed when dealing with the form – in particular the headset spacer or the stem cap.
This part needs special attention, and it is a good idea not to do this close to a drain hole…
Who to ask about Rinko?
I first came across the idea on Jan Heine’s blog. Many practical questions were answered by Tobit Linke, who runs the Dortmund-based bike shop Radbude.de. It’s a tiny store with no online shop, so you have to call or email him.
Tobit is a long-distance cyclist and PBP veteran and a no-bullshit person who rather tries to talk you out of expensive options that would earn him a lot of money but just don’t make sense.

He has many speciality parts needed for Rinko bikes on stock or can source them soon, and he really knows his ship. I bought most of my Rinko kit from Tobit.
The bottom line
All in all, despite some minor downsides, I totally love my Rinko bike. It just adds a new layer of flexibility and freedom to have a proper, full-sized Audaxing bike that you can take on any high speed train, no question asked. This opens many opportunities that I’m willing to put up with a few scratches once in a while…

Hi Olaf,
nice write up. I just want to mention that this additional bracket for the rear drop out is not necessarily needed in all cases.
Since you are using the Wolf link to use that larger cassette it might be needed, since it pushes the rear derailleur to extend more out.
I use a standard derailleur setting and additionally I disengage the derailleur cable like the brake cables as well, and then in most cases you don’t need this bracket.
Here is a link to a picture of my first Rinko bicycle: https://flic.kr/p/Jidnjy.
Gerhard
Rinko is more of a method to pack your bike, and not a bike designed to be travelled with, right?
Great article!
This guy came up with a useful tip as well to keep both wheels together (Google Chrome:Right-click → “Translate to English”):
https://www.gegediagonaliste.fr/le-transport-du-velo-par-le-train/
I quite enjoy this reading but I’m still keen on having an Airnimal (https://airnimal.co/). They made out tandems and I could have made them with S&S couplings…
The blog post you reference that dismisses the usefulness of rinko for travel within the U.S. should not be taken seriously. No surprise there, given that the shop is in the business of installing frame couplers. What would ;you expect them to say?
A rinko-packed bike can be taken as carry-on baggage on Amtrak trains provided that it falls within Amtrak’s liberal size and weight limits. I have traveled with my 63cm frame many times in this way.
If anyone asks (although no one has ever asked me), be prepared to state that your packed bike is a “true folding bike,” not a dismantled conventional bike. This although Amtrak has no comprehensive definition of what “true folding bike” means. In practice, if it meets the size and weight guidelines, you’re good to go.
I have also transported a rinko-packed (and bagged) bike on airlines for a not-too-onerous added charge.
Pingback: Dave’s Rinko Romeo – Dropped Chain
Interesting article, I didn’t know such bikes existed. I’m getting into randonneuring myself, so a transportable bike would be very useful (without the faff of using a car).